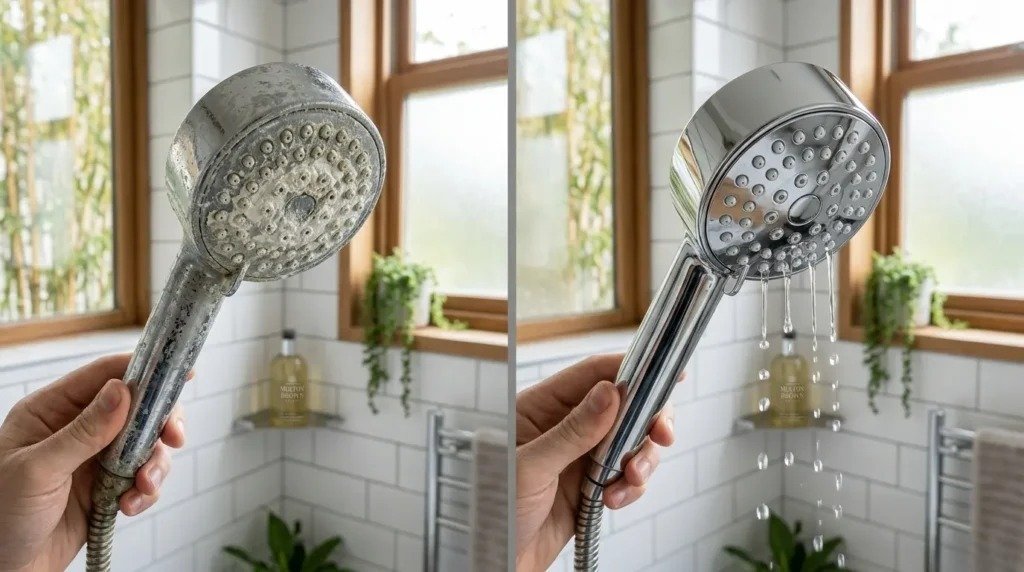
Your hand shower head is used almost every day. Over time, hard water deposits calcium and magnesium minerals on and inside it, building up into a crusty layer called limescale. Soap scum and the warm, damp bathroom air make things worse. Together, they block nozzles, stain the surface, and reduce how well your shower works.
Many people don’t notice the problem until it becomes obvious. Here are five signs your hand shower head needs cleaning:
- Reduced water pressure during your shower
- Water spraying sideways or in uneven directions
- One or more nozzles that are fully blocked
- White chalky deposits are forming around the spray holes
- A dull or dirty-looking shower head surface
These signs won’t fix themselves. The longer you wait, the harder the mineral deposits become to remove.
Fortunately, cleaning a hand shower head is simple and usually requires only white vinegar, a few basic tools, and less than an hour of active effort.
Quick answer: To clean the hand shower head, detach it from the hose. Soak it in undiluted plain white vinegar for 30-60 minutes. Vinegar dissolves limescale, calcium deposits and mineral build-up. Then take an old toothbrush and scrub the nozzles and unblock any holes. Rinse thoroughly in warm running water. Connect the hose again and check the water pressure.
Tools and Materials Needed to Clean a Hand Shower
Have all the tools and supplies you will need within arm’s reach before you get started.
| Item | Quantity / Amount |
| White vinegar | 500–750 ml (bowl method) / 250–500 ml (bag method) |
| Bowl or dish | Large enough to cover the shower head completely |
| Plastic bag + rubber band | Standard-size sandwich bag |
| Toothbrush with soft bristles | 1 |
| Toothpicks or a fine needle | 2–3 |
| Microfiber cloths | 1 -2 |
| Mild dish soap (optional) | A few drops |
White vinegar is the go-to cleaner for a reason. It’s just enough natural acidity to eat through limescale and mineral deposits, but it won’t strip finishes or corrode the shower head body as some harsh chemical cleaners will.
Step-by-Step Guide to Cleaning a Hand Shower Head
Step 1: Remove the Hand Shower Head
First things first, try removing the shower head from the hose by hand. Grip it firmly and turn anticlockwise. Most hand shower heads come off without any tools at all.
If yours feels stuck, look up the manufacturer’s guide before you pull harder. Some models have locking mechanisms you need to release first.
Warning: Keep metal pliers away from chrome and coated finishes. If you need extra grip, wrap a thick cloth around the connector and use that as a buffer. Bare metal on a polished surface leaves scratches that don’t buff out.
Can’t get it off at all? No problem. Move straight to Step 2 — the bag method handles that situation without any removal needed.
Step 2: Soak in White Vinegar
Next, pour white vinegar into a bowl deep enough to swallow the whole shower head. Face the nozzles downward so the spray holes sit fully covered by the liquid. How long you leave it soaking depends on how bad the buildup actually is:
| Condition | Soaking Time |
| Regular monthly cleaning | 15–30 minutes |
| Light mineral deposits | 30–60 minutes |
| Moderate limescale buildup | 1–2 hours |
| Heavy limescale or stubborn blockage | 4–8 hours or overnight |
Bag method for shower heads that won’t come off: Pour vinegar into a sandwich bag, slide it up over the shower head so every nozzle sits underwater, then cinch a rubber band around the neck of the hose to hold the bag steady. Same soaking times apply.
Pro Tip: Slightly warm vinegar gets through calcium buildup noticeably quicker. Heat it for 20–30 seconds in the microwave — stop well before it boils, or the smell gets unbearable.
Warning: Gold, bronze, and other decorative finishes don’t play well with long acid exposure. Cap your soak at 30 minutes for anything other than standard chrome or plastic.
Step 3: Scrub the Nozzles
Once the soak wraps up, grab your old toothbrush and get scrubbing. Work across the whole face of the shower head in short back-and-forth strokes. The vinegar will have already loosened most of the limescale, so it shouldn’t take much effort.
- Run your fingers over any soft rubber or silicone nozzles — gentle circular pressure pops the loosened deposits right off.
- Pick up a toothpick or a thin needle for any holes that still look blocked.
- Angle the tip sideways as you work so you’re nudging deposits outward, not packing them deeper.
Warning: Stabbing a needle straight in damages rubber nozzles faster than any amount of hard water ever would. Slow and steady gets the job done without creating new problems.
After that, hold the shower head under warm running water and rinse away everything the toothbrush knocked loose — vinegar residue included.
Step 4: Clean the Mesh Filter
Here’s the step most people never bother with, and it’s often the real reason water pressure stays disappointing even after a thorough clean.
Tucked just inside the inlet where the hose screws in, there’s a small mesh filter screen. It catches sand, grit, and pipe sediment so those particles don’t reach the nozzles.
- Unscrew the shower head from the hose and peer inside the inlet opening.
- Ease the filter screen out with a toothpick or your fingernail — it sits just inside the rim.
- Hold it under a running tap and rinse until the water runs clear through the mesh.
- Look it over for any holes or tears before you slot it back in.
You’ll often see the water pressure improve the moment you reinstall a freshly rinsed filter. It’s a small thing that makes a big difference.
Step 5: Reassemble and Test
Finally, screw the shower head back onto the hose by hand. Go clockwise and keep turning until it feels snug against the connector.
- Peek inside the connector joint and make sure the rubber washer lies completely flat before the final tightening.
- Turn the shower on and let it run freely for 30 to 60 seconds — this pushes out any loose grit or vinegar still sitting inside.
- Stand back and watch the spray — every nozzle should fire in a clean, even pattern.
- Swivel the head into whatever angle works best for you.
Warning: The moment it feels tight, stop turning. One twist too many strips the thread or flattens the washer out of shape, and either way, you end up with a dripping joint.
Cleaning Tips for Different Hand Shower Head Types
Not every shower head takes the same kind of cleaning. The material and finish of yours changes what products and tools are safe to use.
Chrome Hand Shower Heads
Chrome scratches easily if you’re not careful. Stick to soft cloths and avoid any abrasive cleaning pads or powders. Once you’re done cleaning, dry the surface straight away — this stops water spots from dulling the shine.
Stainless Steel Hand Shower Heads
A microfiber cloth works best on stainless steel because it lifts water marks without leaving new ones behind. Keep rough scrubbing pads away from the surface. Even light scratching on stainless steel shows up clearly under bathroom lighting.
Plastic Hand Shower Heads
Plastic doesn’t handle strong chemicals well — they can cloud the surface or cause it to crack over time. Clean gently with diluted white vinegar and a soft cloth. Skip anything abrasive altogether.
Silicone Nozzle Shower Heads
Silicone nozzles are actually the easiest type to maintain. Run your fingers over them in circular motions every week or two. This stops limescale from setting hard between cleaning sessions.
How Often Should You Clean Your Hand Shower Head?
How often you need to clean depends a lot on your local water supply.
- Hard water areas: Clean every 1–3 months, mineral deposits build up quickly.
- Soft water areas: Every 3–6 months is enough for most people.
- Every week: Wipe the surface down to prevent visible deposits from forming in the first place.
5 Quick Maintenance Tips
1. Give the shower head a quick dry after every use — moisture is what feeds mineral buildup.
2. Spot a white crusty patch forming? Wipe it off now before it turns into a cleaning project.
3. Let all the nozzles run fully open at least once a week so nothing sits blocked for long.
4. Pull out the mesh filter every few months and give it a rinse under the tap.
5. If limescale keeps coming back fast, a whole-house water softener tackles the root problem rather than the symptoms.
Final Thoughts
A grimy hand shower head is an easy problem to fix. White vinegar, a toothbrush, and an hour of your time are genuinely all it takes to restore strong, even water pressure and clear out years of mineral deposits and calcium buildup.
Don’t wait until the nozzles are fully blocked. Pick a cleaning schedule that matches your water type and stick to it.
Ready to get started? Grab a bottle of cleaner or white vinegar and give your hand shower head the clean it deserves.
Frequently Asked Questions
Does Vinegar Damage a Shower Head?
In most cases, White vinegar from the supermarket sits at roughly 5% acetic acid, which is strong enough to cut through limescale but gentle enough to leave chrome and plastic unharmed. The only time trouble shows up is when decorative finishes like brushed gold sit in vinegar for too long. Keep those soaks under 30 minutes, and you’ll be fine.
Can I Use Baking Soda to Clean a Shower Head?
Yes, and it’s worth trying on patches that vinegar alone doesn’t shift. Baking soda brings mild abrasive action to the job, so it scrubs away what soaking misses. Stir it together with a splash of white vinegar to form a paste, press it onto the stubborn spots, wait a few minutes, then scrub off with a toothbrush and rinse.
Why is My Hand Shower Head Still Clogged After Cleaning?
When the nozzles stay blocked after a proper soak and scrub, the blockage usually lives further inside the unit. A worn flow restrictor or a gunked-up internal valve tends to be the culprit, and neither responds to vinegar. Call a plumber to inspect those internal parts rather than soaking the head again and hoping for different results.
What Happens if You Don’t Clean Your Shower Head?
Water pressure drops, spray patterns go uneven, and the fixture starts looking rough. There’s also a less visible problem — a 2018 study in the journal mBio found that neglected shower heads can harbour Mycobacterium bacteria, which grow well in damp, undisturbed environments.
Related Products
Explore products related to this article
-
 25%
25%Box Drain with Flip Bowl – 100×450 mm Stainless Steel Floor Drain
Original price was: ₹2,500.00.₹1,875.00Current price is: ₹1,875.00. Add to cart -
58%
Bonn Hand Shower ABS AB2136 | Begin Faucets
Original price was: ₹2,750.00.₹1,150.00Current price is: ₹1,150.00. Add to cart -
25%
Brass Extension Nipple 1 Inch (25mm) AA0001 – 5pcs | Begin Faucets
Original price was: ₹519.00.₹390.00Current price is: ₹390.00. Add to cart -
25%
Overhead Shower Leaf Shape Chrome Finish AB3101 | BEGIN Faucets
Original price was: ₹1,400.00.₹1,050.00Current price is: ₹1,050.00. Add to cart