A handheld shower diverter allows you to switch between your overhead shower and a hand shower. You can easily change the water flow between the two. Most homeowners can install a handheld shower diverter themselves without calling a plumber. The job usually takes 30 to 60 minutes with basic tools. Difficulty level: easy and beginner-friendly.
More Indian homeowners want flexible bathing options these days. A fixed overhead shower alone doesn’t wash pets, clean corners, or rinse the bathroom floor easily. That’s why an overhead shower with a hand shower setup is becoming common in homes across cities and towns.
A diverter makes this switch simple. You get both shower types on one wall, without adding new pipes or breaking tiles.
This guide walks you through every step to install hand-held shower diverter fittings on your own, from tools to final testing.
What is a Hand-Held Shower Diverter
A hand-held shower diverter is a small fitting that controls where your water goes. It sits between your shower pipe and the showerhead.
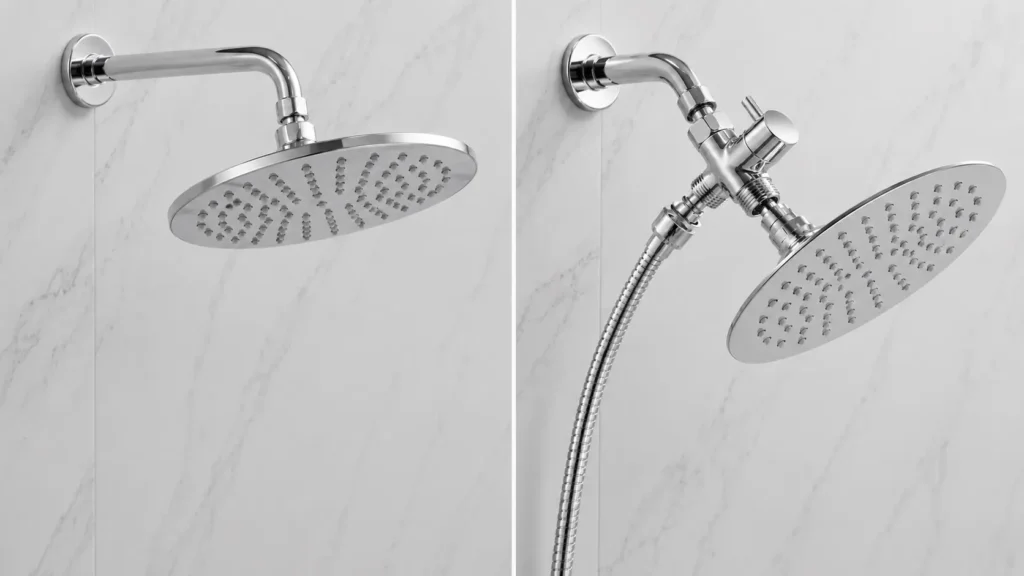
This shower diverter valve lets you switch water flow between your overhead shower and your hand shower. Turn the diverter one way and water flows overhead. Turn it the other way, and water flows through the hand shower hose instead.
The hand shower diverter is useful because it gives you two shower options from one water line. You don’t need separate plumbing or extra pipework for each shower type.
You’ll usually find this fitting on the shower arm — the metal pipe that connects the wall outlet to your showerhead.
Expert Tip: Most shower fittings sold in India use a G1/2 (½-inch BSP) threaded connection — the same global standard used on bathroom accessories worldwide. In most cases, a hand-held shower diverter will thread on directly without extra adapters. Still, check the thread type on your wall outlet before buying, since older buildings or some local brands may differ.
Tools & Materials Required
Gather these items before you start, so you’re not dripping wet and hunting for a wrench halfway through. A little prep now saves you a messy pause later.
| Tool/Material | Purpose |
| Adjustable wrench | Grips and turns pipe nuts of different sizes |
| PTFE tape (Teflon tape) | Thin white tape you wrap on threads so water doesn’t seep out |
| Soft cloth | Mops up spills and keeps the chrome finish scratch-free |
| Bucket | Sits under the pipe to catch leftover water |
| Hand shower hose | Carries water from the diverter fitting to your hand shower |
| Diverter valve | Lets you switch water between the overhead and hand shower |
| Rubber washer | Presses into joints to stop small drips at the seams |
Things to Check Before Installation
Before you touch a single pipe, run through this checklist. It takes five minutes and saves you a lot of frustration later.
- Water Supply: Turn off the main valve first. Working with live water pressure makes everything harder and messier.
- Thread Type: Check that your wall outlet uses a G1/2 BSP thread. This is the standard most fittings follow, but confirm before you buy.
- Shower Arm Condition: Old shower arms sometimes have rust or leftover tape stuck on them. Clean threads matter more than people realise.
- Hose Length: Stand where you usually shower and measure the distance to the wall outlet. Buy a hose that reaches comfortably, with a little slack.
- Water Pressure: Most standard diverters work between 0.5 and 5 bar. Before installing, check your unit’s product sheet to make sure it’s appropriate for your home’s water pressure.
- Rubber Washer: Press in lightly. Replace it if it’s hard or cracked before you begin your shower diverter installation.
Step to Install a Hand Held Shower Diverter
Once your checks are done, the actual fitting doesn’t take long. Follow these steps in order, and don’t rush the tightening.
Step 1: Turn Off the Water Supply
Find your main water valve and shut it firmly before touching anything. Water can spray out unexpectedly the moment you loosen the old showerhead. This one step keeps the whole job dry and manageable.
Tip: Open the tap briefly afterward to drain any water still sitting in the pipe. When nothing drips out, and the pipe stays dry, you’ll know it worked.
Step 2: Remove the Old Showerhead
With one hand, hold the shower arm and with the other, use an adjustable wrench to loosen the showerhead. Turn it counter-clockwise until it comes free. You need bare, exposed threads before the new diverter can go on.
Tip: Slip a cloth between the wrench and the pipe so the chrome finish doesn’t get scuffed. After this step, the arm sits empty and ready for cleaning.
Step 3: Clean the Threads
Use a soft cloth to wipe away any rust, dirt, or bits of old tape from the exposed threads. A clean surface lets the diverter sit tight without rocking. Leftover dirt here often causes a leak later.
Tip: Use your finger to feel along the threads for rough or worn spots. Good threads will be smooth and bare with no rough spots.
Step 4: Apply PTFE Tape
Wrap the PTFE tape (aka Teflon tape) 3-5 times around the threads in the direction of the threading (clockwise direction). This tape fills the tiny gaps between the threads so water can’t leak through. Most leaks trace back to someone skipping this small step.
Tip: Keep the tape pulled tight as you wind it so it doesn’t bunch or fold over. Done right, the threads should feel padded but not sticky.
Step 5: Install the Diverter
Thread the diverter valve onto the shower arm by hand, turning it clockwise until it stops moving easily. Give it one more gentle quarter-turn with the wrench to seat it firmly. This is the core step in the whole install shower diverter process.
Tip: If it resists early on, back off and restart. Forcing it usually means the threads have caught wrong. Once fitted, the diverter should sit flat against the wall with no visible gap.
Step 6: Install the Hand Shower Hose
Screw the hose clockwise onto the diverter’s side outlet until tight. Before you tighten fully, check that the rubber washer inside the connector is sitting flat and in place. A washer that’s missing or sitting crooked will leak right at this spot.
Tip: Hand-tighten as far as it’ll go, then use the wrench for just a small final turn. The hose should hang steady afterward, with no looseness at the joint.
Step 7: Install the Hand Shower
After that, screw the hand shower head onto the open end of the hose in a clockwise direction until snug. This is the final step of the hand shower installation and ties the whole thing together. Stop before it gets hard to turn — overtightening cracks the thread seal.
Tip: Press the buttons on the hand shower and check its grip before you clip it into the wall holder. With this attached, both shower options are now physically connected.
Step 8: Test for Leaks
Turn your main water supply back on slowly, keeping an eye on every joint you’ve touched. Flip the diverter back and forth to run water through both the overhead and hand shower. This check confirms whether the whole shower diverter installation holds properly.
Tip: Slide a dry cloth under each connection for a minute or two. Any dampness shows up immediately. If everything stays bone dry, you’re finished and ready to use it daily.
Common Mistakes to Avoid
| Mistake | Fix |
| Skipping PTFE tape | Wrap threads 3–5 times before fitting |
| Cross-threading | Start threading by hand, not with a wrench |
| Overtightening | Hand-tight, then a gentle quarter-turn only |
| Missing washer | Always fit the rubber washer inside the connector |
| Ignoring small drips | Run water and check all joints before first use |
Maintenance Tips
Looking after your shower diverter valve doesn’t take much time. A few small habits will keep it working well for years.
- Wipe It Down Monthly: Run a soft cloth over the diverter body once a month. This stops dust and soap scum from settling into the switch mechanism.
- Clear Hard Water Deposits: Water in many Indian cities is hard, and it leaves chalky white deposits on metal fittings. Check every month or two, since buildup can make the diverter stiff to turn.
- Feel the Rubber Washer: Press it gently now and then. If it feels hard, brittle, or cracked, that’s usually the first warning before a leak starts.
- Check the Hose: Use your hand to feel along the flexible hose for cracks or soft, worn spots, particularly at the connectors on each end.
- Diluted Vinegar, Not Harsh Chemicals: Harsh chemical cleaners will dull the chrome finish over time. Instead, mix 1 part white vinegar with 3 parts water, soak a soft cloth, and wipe down the diverter body. It softly removes hard water build-up. Do not use undiluted vinegar or leave it on the fitting for longer than a few minutes.
Summing It Up
Fitting a hand-held shower diverter isn’t a big job, even for someone who’s never touched a wrench before. With basic tools and a little patience, most Indian bathrooms can have a dual shower system up and running within half an hour. Just remember to check every joint for leaks before you start using it daily.
Once your diverter is in place, you can learn how to add a hand-held shower head to complete the setup.
Frequently Asked Questions
Will a Diverter Affect My Water Pressure?
If fitted properly, it should not. If the flow is weaker after installation, check that no joint is loose or a small piece of debris is blocking the opening of the diverter.
How Long Does a Diverter Usually Last?
A brass diverter, properly maintained, typically lasts 8 to 15 years. Plastic models may need replacement in 3 to 5 years. Hard water, common in Indian cities, speeds up wear, so regular cleaning makes a real difference.
Can I Install a Diverter on an Old or Rusted Shower Arm?
A little surface rust is fine once you clean it off. But if the arm is badly pitted or corroded, replace it first. A damaged arm won’t hold the diverter securely, and the fitting can loosen over time.
Does a Bathroom Shower Diverter Work on Both Hot and Cold Water Lines?
Yes. It redirects whatever water is already flowing through your shower pipe. Temperature has no effect on how the valve works.
What if Water Leaks From the Diverter After Installation?
Start by giving the leaking joint a slightly firmer turn with your wrench. If that doesn’t stop it, take the fitting apart, wrap fresh PTFE tape on the threads, and reassemble. Most post-installation leaks trace back to too few tape wraps or a missing washer.
Can I Fit a Hand Held Shower Diverter If My Bathroom has No Shower Arm?
No. A shower arm diverter attaches to an existing shower arm. If your bathroom has only a wall tap with no overhead pipe, ask a plumber to fit a shower arm first before a diverter can go on.
Related Products
Explore products related to this article
-
 25%
25%Rose Gold Rain Shower Head 12×12 AB3114RG – Overhead Shower | Begin Faucets
Original price was: ₹3,400.00.₹2,550.00Current price is: ₹2,550.00. Add to cart -
25%
Matte Black Overhead Shower 10×10 | Stainless Steel | Square Matte Finish
Original price was: ₹2,700.00.₹2,025.00Current price is: ₹2,025.00. Add to cart -
25%
Square Shower Arm 18 Inch Wall Mount AD0163 – Begin Faucets
Original price was: ₹800.00.₹600.00Current price is: ₹600.00. Add to cart -
25%
Bottle Trap Rose Gold Finish 300mm AA0041RG | Begin Faucets
Original price was: ₹1,280.00.₹960.00Current price is: ₹960.00. Add to cart