

Can You Install an Outdoor Faucet to Poly Pipe?
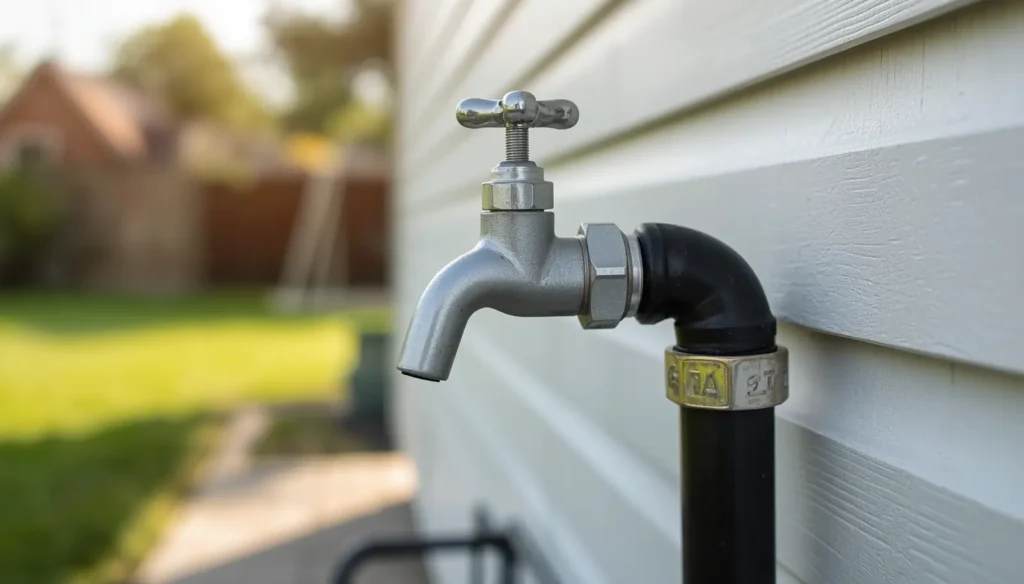
You’re standing in your yard, staring at that black poly pipe sticking out of the ground. You’ve got a faucet in your hand. And one big question in your head—can I actually connect these two things? Good news: yes, you can. But here’s the thing — there’s a right way to do it and a wrong way. If you do it wrong, you’ll end up with leaks, loose fittings, or a faucet that doesn’t hold. If you do it right, you will have a solid, reliable outdoor water source. In this guide, you’ll learn exactly what fittings you need, how to connect them step by step, and the common mistakes you’ll want to avoid. What is Poly Pipe? Poly pipe is a flexible plastic pipe made from polythene. It’s lightweight, inexpensive, and built to take on outdoor waterlines like a boss. You’ve probably seen that black, flexible pipe that goes underground to a well, garden, or irrigation system. That’s a poly drop. There are a Few Common Types: Can You Connect an Outdoor Faucet Directly to Poly Pipe? The short answer is yes, you can. But not directly. Here’s the deal. The poly pipe doesn’t have threads on it. It’s just a smooth, flexible plastic tube. Most outdoor faucets, also called hose bibs or spigots, have threaded metal connections. So you can’t just push the two together and call it a day. You need a fitting in the middle to make it work. Think of it like an adapter. It bridges the gap between the smooth poly pipe and the threaded faucet. Without it, you’ll get leaks, loose connections, or nothing will fit at all. The fitting you need is called a poly insert fitting. It has two ends: Once you have the right fitting, the whole job becomes pretty straightforward. It’s not complicated; you just need to know what to grab at the hardware store. Tools and Materials You’ll Need Before you start, gather everything you need. It saves you from making three trips to the hardware store. Here’s a simple list to work from: Item What It’s For Outdoor faucet / hose bib The actual spigot you’re installing Poly insert adapter (match your pipe size) Connects poly pipe to the threaded faucet 2 stainless steel hose clamps Keeps the fitting locked tight on the pipe Screwdriver or nut driver Tightens the hose clamps Teflon tape Seals the threaded connection Pipe cutter or sharp utility knife Cuts the poly pipe clean and straight Pressure-treated wood / mounting board Gives the faucet a solid surface to mount on Mounting screws Secures the faucet to the board or wall Heat gun or warm water (optional) Softens the pipe end for easier fitting insertion Getting the right pipe size matters most. Poly pipe usually comes in ½ inch or ¾ inch, and make sure your insert adapter matches exactly. Quick Tip: Grab one extra insert fitting while you’re at the store. They’re cheap, and if one cracks during install, you’ll be glad you have a backup. Step-by-Step: How to Install an Outdoor Faucet to Poly Pipe Let’s get to work. Follow the directions below and you’ll have a working outdoor faucet in no time at all. Step 1: Turn Off the Water Start at your main water shutoff and turn it off completely. Then open a faucet inside your home to release any pressure left in the lines. Don’t skip this step. Working on a live waterline is a mess waiting to happen. Step 2: Pick Your Spot and Mount a Backer Board Choose where you want the faucet to sit. If you plan on mounting it on a post or fence, or in an area where there is no flat surface, you can first screw some pressure-treated wood to that location. This will provide your faucet something to grip onto. Step 3: Cutting the Poly Pipe Either a pipe cutter or a sharp utility knife may be used when cutting the poly pipe. The sharper your cut, the easier you will find it sealing the cut pipe. Tip: Score the pipe slowly with a utility knife and rotate it as you cut. You’ll get a much cleaner edge. Step 4: Warm the End of the Pipe Dip the cut end of the poly pipe into hot water for about 30 seconds. This softens the plastic just enough to make sliding in the fitting much easier. No hot water? A heat gun on low works too, just make sure you don’t overdo it. Step 5: Slide the Hose Clamps On First Before you insert the fitting, slide two stainless steel hose clamps onto the pipe. This step is easy to forget and annoying to fix later once the fitting is already in. Step 6: Push the Insert Adapter Into the Pipe Now push the barbed end of the poly insert adapter firmly into the pipe. It should be tight and secure. Screw it in all the way until the pipe sits against the shoulder of the fitting. Step 7: Tighten the Two Hose Clamps Put both hose clamps over the barbed end of the fitting and tighten with a screwdriver. Tip: Don’t skip the second clamp. A poly pipe needs two clamps for a truly tight seal. One just isn’t enough to hold underwater pressure. Step 8: Wrap the Faucet Threads With Teflon Tape Take your Teflon tape and wrap it around the threaded end of the adapter two or three times. Always wrap in the direction of the threads. This makes a watertight seal when you screw the faucet on. Step 9: Screw the Faucet On Begin by hand-threading your outdoor faucet or hose bib onto the adapter. Once it’s hand-tight, take a wrench and snug it up well. Don’t overdo it; it should be firm and secure, not a death grip. Step 10: Turn the Water Back On and Check for Leaks With the connections in place, slowly turn the main water shutoff back on. Don’t rush it. Watch