

How to Add a Hand Held Shower Head in 7 Easy Steps
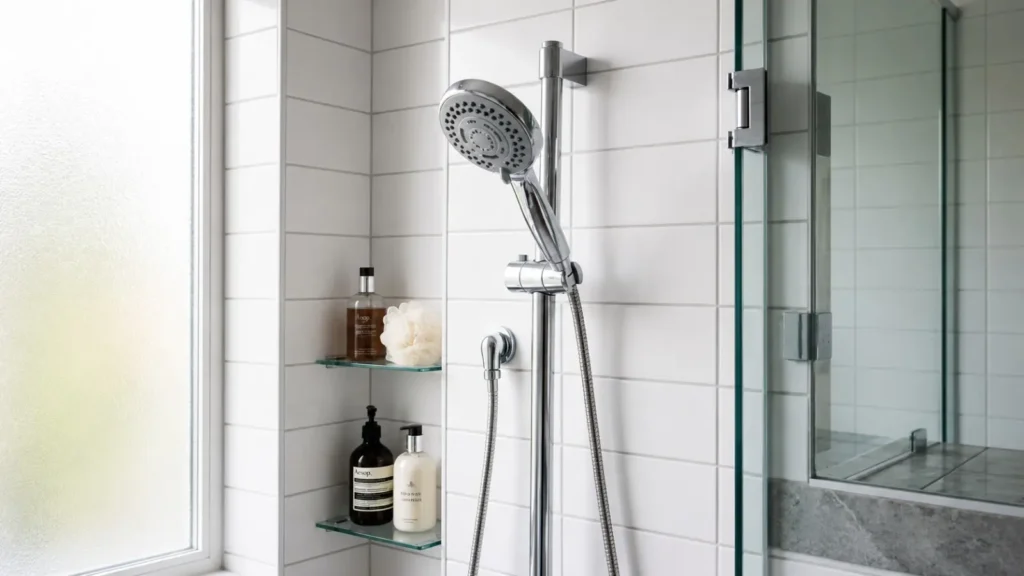
A basic shower gets the job done, but a handheld shower head makes it so much better. A handheld shower head is a flexible, hose-connected shower head you can hold and move freely. And homeowners love to add one for simple reasons: The best part? You don’t need a plumber. Most people finish this upgrade in under an hour. In this blog, you will learn exactly how to add a hand held shower head in 7 easy steps. We cover every tool, every part, and every move from start to finish. Tools and Materials Required Collect these items before you begin; having everything on hand saves time and prevents trips to the hardware store in the middle of the job. Check Your Existing Shower System Before you begin, check out your current shower to avoid any surprises when you’re working. 1. Most home showers use a ½-inch NPT (National Pipe Thread) connection. This is the standard screw fitting on your shower arm — the pipe sticking out of your wall. Nearly all handheld shower kits fit this size. 2. Your current fixed shower head simply screws off by hand or with a wrench. No special tools needed. 3. But some setups need a diverter valve, a little switch that directs water between two shower heads. You may need one if you want to keep your old shower head running alongside the new handheld unit. More on that in a later step. 4. Most standard bathrooms need zero extra parts beyond the kit itself. So, check your setup first and shop with confidence. How to Install a Hand Held Shower Head in 7 Easy Steps Difficulty Level Time Required Easy 20–60 minutes Step 1: Remove the Old Shower Head Wrap a soft cloth around the base of your old shower head. This stops the wrench from leaving marks on the metal. Grip the cloth-covered base with your adjustable wrench and turn it counterclockwise. Once it starts to move, spin it off the rest of the way with your hand. Caution: Forcing a stuck shower head too fast can bend the shower arm inside the wall. Work slowly and let the wrench do the job. Step 2: Clean Off the Old Tape and Inspect the Threads Use your fingernail or a dry rag to peel off every bit of old plumber’s tape from the shower arm. Old tape leaves behind a gummy layer that stops new tape from sealing well. After clearing it off, hold the arm near a light source and look at the threads carefully. Smooth, clean threads mean you are ready for the next step. Pro Tip: Run your fingertip along the threads after wiping them down. Anything that feels rough, raised, or uneven needs a closer look before you go further. Step 3: Apply New Plumber’s Tape On The Threads Get the first edge of the plumber’s tape really tight against the bottom of the shower arm threads. Wind the tape around the threads moving in a clockwise direction. Go around two to three full times, keeping the tape pulled tight the whole way. Press the torn end flat against the threads with your thumb so nothing hangs loose. Caution: Wrapping the tape in the wrong direction, counterclockwise, makes it unravel the second you screw anything onto it. Always go clockwise. Step 4: Screw On the Mounting Bracket Pull the mounting bracket out of your handheld shower head kit. Line it up with the shower arm and begin threading it on by hand. Turn it clockwise and keep going until your hand cannot move it any further. Wrap your cloth around the bracket and tighten it one quarter turn more with the wrench. Pro Tip: The bracket should face straight out from the wall once tightened. The hose and shower head will hang all weird if it is at an odd angle. Step 5: Connect the Shower Hose to the Bracket Take the shower hose from your kit and find the end that fits into the opening of the bracket. Thread the end onto the bottom of the bracket by hand first. Once hand-tight, hold the bracket steady with one hand and give the hose fitting a short quarter turn with the wrench. Let the hose fall naturally and make sure no section of it is twisted or kinked. Pro Tip: A twisted hose puts stress on both connection points and shortens the life of the hose significantly. Step 6: Connect the Hand Held Showerhead to the Hose. Hold the open end of the shower hose with one hand to keep it steady. Take the handheld shower head and thread it onto the hose end clockwise. Hand-tighten it until you feel firm resistance. Then use the wrench with the cloth to snug it up one final quarter turn, nothing more. Pro Tip: Most leaks in a handheld shower head installation happen at this joint. Take your time here and make sure the connection feels solid before testing. Step 7: Turn the Water On and Look for Leaks Reach into the shower and turn the water on to full flow. Stand back and watch every connection point for a full minute — the shower arm, the bracket base, and both ends of the hose. Press a dry fingertip against each joint and check for any moisture at all. Then switch between every spray setting on the handheld shower head to make sure water pressure stays strong and consistent. Caution: A small drip caught now takes seconds to fix. Left alone, that same drip can damage your wall for weeks and months. How to Keep Your Existing Shower Head and Add a Handheld One Difficulty Level Time Required Moderate 30–90 minutes The good news is you do not have to choose between your old shower head and a new handheld one. A simple extra part lets you run both. Using a Diverter Valve A diverter valve is a small fitting that splits incoming water between two separate outlets —
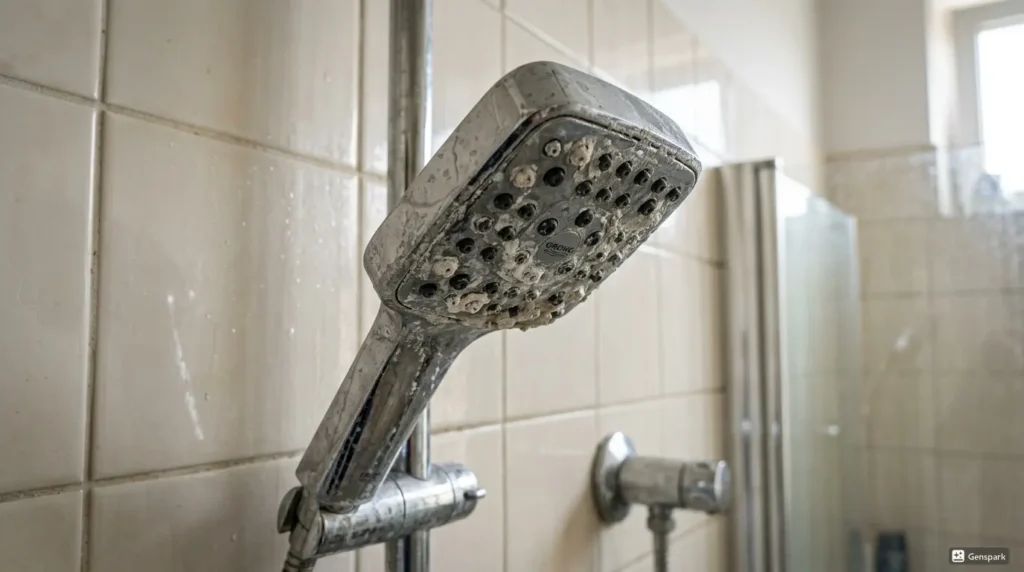
How to Clean a Moen Shower Head: Step-by-Step Guide
Learning how to clean a Moen shower head can save you a lot of frustration. Moen is an American brand with a strong reputation. More Indian homes are now choosing it for its build quality and modern look. But here is the problem: Indian water is tough on shower heads. Cities like Delhi, Jaipur, and Nagpur have very high TDS levels of water. This means the water is rich with minerals like calcium and magnesium. Over time, these minerals build up inside your shower head. You start getting a weak, uneven spray. White crusty patches show up around the nozzles, too. Many people think the shower head is broken. It is not. It just needs a clean. This guide shows you exactly how to fix it in under 60 minutes. Quick Answer: Pour one to two cups of white vinegar into a plastic bag. Hang the bag over your Moen shower head so all the nozzles sit inside the vinegar. Hold the bag in place with a rubber band. Leave it for one to two hours. Then pull the bag off and turn on the shower. Run hot water for 30 seconds to flush everything out. What You’ll Need to Clean a Moen Shower Head Basic Supplies (No Removal Method): Use these items for the simple bag method. You likely have most of them at home already. For Deep Clean (Removal Method): Use these extra items when the shower head needs to come off for a thorough clean. Which Cleaner is Safe for Your Moen Shower Head? Not every cleaner works on every finish. Using the wrong one can damage the coating. Check this table before you start. Cleaner Safe for Moen Best For Avoid On White Vinegar Yes Chrome, Nickel Matte Black, Gold CLR Cleaner Caution Severe buildup only All delicate finishes Baking Soda Paste Yes Surface scrubbing Inside cartridge Bleach No Never use on Moen All finishes Mild Dish Soap Yes Matte Black, Gold N/A Will Vinegar Damage Your Moen Shower Head Finish? Every Moen finish behaves differently when it meets vinegar. Using the wrong cleaner is the top reason finishes get permanently damaged, and it can void your Moen warranty, too. Check your finish below before you pick up that bottle. Moen Finish Vinegar Safe Soak Time Limit Best Cleaning Method Chrome Yes Up to 2 hours Undiluted white vinegar Brushed Nickel Caution 30 minutes max Diluted vinegar (1:1 water) Matte Black No Never soak Mild soap + warm water Spot Resist Brushed Gold No Never soak Damp microfibre only Brushed Stainless Caution 30 minutes max Diluted vinegar Oil Rubbed Bronze No Never soak Mild soap + warm water Tip: When in doubt, mild dish soap and warm water work safely on every Moen finish. How to Clean a Moen Shower Head Step By Step Method 1: Cleaning the shower without removing the shower head Best For: Light to Medium Buildup | Chrome and Nickel Finishes 1. Take a plastic ziplock bag and add 1-2 cups of the white vinegar. 2. Slide the shower head into the bag so every single nozzle touches the vinegar. 3. Hold the bag firmly against the neck and lock it in place with a rubber band. 4. Walk away and let it sit for 1 to 2 hours. 5. Thirty minutes in, take an old toothbrush, dip it in the vinegar and work it across the faceplate. 6. When the time is up, carefully pull the bag down and off. 7. Turn the shower on full and run hot water for 60 seconds to wash the mineral bits away. 8. Take a microfibre cloth and dry the shower head face completely. Hard Water Tip: If your city TDS is above 500 ppm, soak the shower head overnight with undiluted vinegar for best results. Method 2: Deep Clean by Removing the Shower Head Best For: Severe Buildup | Blocked Nozzles | Annual Maintenance 1. Fold a thick cloth around the shower head collar before touching anything else. 2. Set the adjustable wrench on top of the cloth — bare metal against the finish will scratch it badly. 3. Rotate anti-clockwise until the shower head comes free from the pipe. 4. Drop it straight into a bowl of undiluted white vinegar. 5. Two hours work for normal buildup. For anything heavier, leave it overnight. 6. Pick up a toothbrush and scrub every nozzle one by one, then hold it under running water to rinse. 7. Before putting it back, wind fresh plumber’s tape clockwise around the pipe threads. 8. Screw it on by hand first, then use the wrench for just a quarter turn, stop right there. How to Clean the Moen Filter Screen Inside every Moen shower head sits a small mesh filter screen. In hard water areas, this screen clogs faster than the nozzles, and most people never clean it. 1. Remove the shower head using the steps above.2. Look inside the inlet connection; the filter screen sits right there.3. Use needle-nose pliers to pull it out gently.4. Rinse it under water and scrub softly with a toothbrush dipped in vinegar. 5. Let it air dry fully before putting it back. 6. Look closely at the screen; if it looks torn or corroded, then replace it. New filter screens are very cheap and can be bought on Amazon India or from any hardware shop. Cleaning Guide for Specific Moen Shower Head Types Fixed Wall-Mount Shower Heads Use the bag method every time. Handheld Shower Heads Always detach from the hose before soaking. Rain Shower Heads These have large faceplates, so they need more time. Moen Magnetix Shower Heads Remove the magnetic dock before you start cleaning. Moen Dual Shower Systems Clean both heads on the same day for even results. 5 Mistakes That Damage Your Moen Shower Head While Cleaning 1. Bleach or Harsh Acids: Your finish will peel off, and Moen will not honour the warranty after that. 2. Vinegar Soaks on Matte Black or Gold: These finishes are
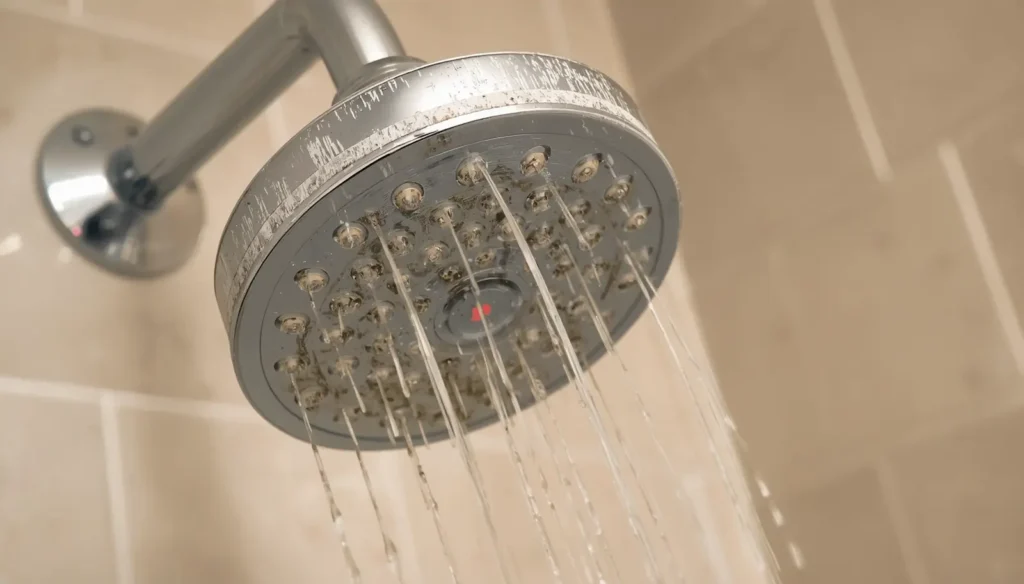
How to Clean Limescale From a Shower Head Effectively
The white crusty stuff that develops around your showerhead after a while is called limescale. It forms because of hard water — water that carries dissolved calcium and magnesium. When water hits your shower head and dries, those minerals stay behind. Each shower adds a little more, and before long, your spray nozzles start blocking up. Hard water is a daily reality across much of India. Delhi, Mumbai, Bengaluru, Chennai, and Jaipur all sit in high-hardness zones, with calcium carbonate levels frequently crossing 200–500 mg/L, beyond the Bureau of Indian Standards’ recommended limit for drinking water. If You See: Your shower head may need cleaning • Uneven or Odd-Angled water spray • Significantly less pressure than normal • Nozzle plate with white or yellow crust • Some spray holes are totally blocked Quick answer: Soak the shower head in white vinegar for 30 minutes to 3 hours, depending on the amount of buildup and the finish. Scrub nozzles with a toothbrush and rinse well. Cleaning every 4–6 weeks will help to prevent heavy deposits. How to Clean Limescale From a Removable Shower Head Removing the shower head gives you the most thorough clean. Here is a precise, step-by-step method. What You Need: • White vinegar (500ml–1 litre, depending on bowl size) • A bowl or container large enough to fully submerge the shower head • An old toothbrush • A toothpick or pin • Warm water for rinsing Steps: 1. Unscrew the shower head from the hose or arm. Most twist off counter-clockwise by hand. Use a cloth-wrapped wrench if it is stuck — never use bare metal tools directly on the fitting. 2. Place it in a bowl and pour in white vinegar. Use enough vinegar to fully submerge the shower head — typically 500ml for a standard handheld unit, up to 750ml–1 litre for a larger rain shower head. 3. Soak according to your finish and buildup level: Finish Type Light Buildup Heavy Buildup Chrome 30 minutes 45–60 minutes Stainless Steel 30–45 minutes 60–90 minutes Brushed Nickel 20–30 minutes 30–45 minutes Matte Black 20 minutes 30 minutes max Gold / Brass 15–20 minutes Use diluted vinegar (1:1 with water) for 30 minutes 4. Scrub the spray nozzles with a toothbrush using small circular motions. Pay attention to the edges of each nozzle hole where calcium deposits tend to collect. 5. Use a toothpick or pin to poke through individually blocked spray holes. This clears any softened mineral deposit that the soak loosened but did not fully dissolve. 6. Rinse thoroughly under warm running water for at least 30 seconds. Make sure no vinegar smell remains inside the head. 7. Reattach the shower head and run it for 15–20 seconds to flush out any loosened debris from inside the water channels. Tip: If your shower head has rubber nozzles, squeeze each one with your fingers before scrubbing. This alone can break up a significant amount of surface-level mineral buildup. How to Clean a Fixed Shower Head Without Removing It Not all shower heads detach easily, particularly older wall-mounted or ceiling-mounted rain shower heads found in Indian bathrooms. The plastic bag method works well in these situations. You Will Need: • A zip-lock bag or sturdy plastic bag • White vinegar (usually 300–500ml will suffice) • Rubber band, zip tie or string • A soft brush or an old toothbrush Steps: 1. Fill a plastic bag with white vinegar. Use 300ml for a standard fixed head, 400–500ml for a wider rain shower plate so the nozzles are fully covered. 2. Put the bag over the shower head so the spray plate is immersed in the vinegar. 3. Secure the bag tightly with a rubber band or zip tie around the shower arm or neck. Be sure the nozzles are submerged, and the bag is not leaking. 4. Leave it to soak: Buildup Level Soak Time Light (mild white film) 1 hour Moderate (clear crust) 2 hours Heavy (thick, uneven spray) 3–4 hours or overnight 5. Remove the bag carefully and dispose of the vinegar. 6. Scrub the nozzle plate with a soft brush, focusing on clogged holes. 7. Run the shower at full pressure for 20–30 seconds. This flushes loosened deposits out through the spray holes. Finish-Specific Tip: For brushed brass or matte black fixed shower heads — increasingly popular in Indian premium bathroom fittings — dilute the vinegar with equal parts water before filling the bag. Concentrated vinegar left too long on these finishes can cause surface discolouration. Other Ways to Get Rid of Stubborn Limescale In some places, the water is so hard that vinegar won’t do the job alone. Here are three alternatives that work well: 1. Baking Soda Paste Mix 3 tablespoons of baking soda with enough water to make a thick paste. Apply directly to the nozzles and the mineral deposits. Leave on for 15–20 minutes, then scrub with a toothbrush and rinse. This method is a bit abrasive, but won’t scratch the surface. 2. Citric Acid Solution Dissolve 1–2 tablespoons of citric acid powder (widely available in Indian grocery stores and online) in 500ml of warm water. Use this as your soaking liquid instead of vinegar. Citric acid is effective, odourless, and gentler on gold and polished brass finishes compared to undiluted white vinegar. 3. Commercial Descalers Products like Harpic Bathroom Cleaner, Lizol Bathroom Cleaner, Begin Bathroom Cleaner or imported options like HG Limescale Remover work on heavy calcium deposits. Always follow the manufacturer’s instructions. Most require only 10–15 minutes of contact time. Important: After any cleaning method, rinse the shower head thoroughly for at least 30 seconds. Leftover cleaning solution inside the water channels can irritate skin during your next shower. Common Mistakes to Avoid Cleaning your shower
How to Clean a Rainfall Shower Head Without Damage
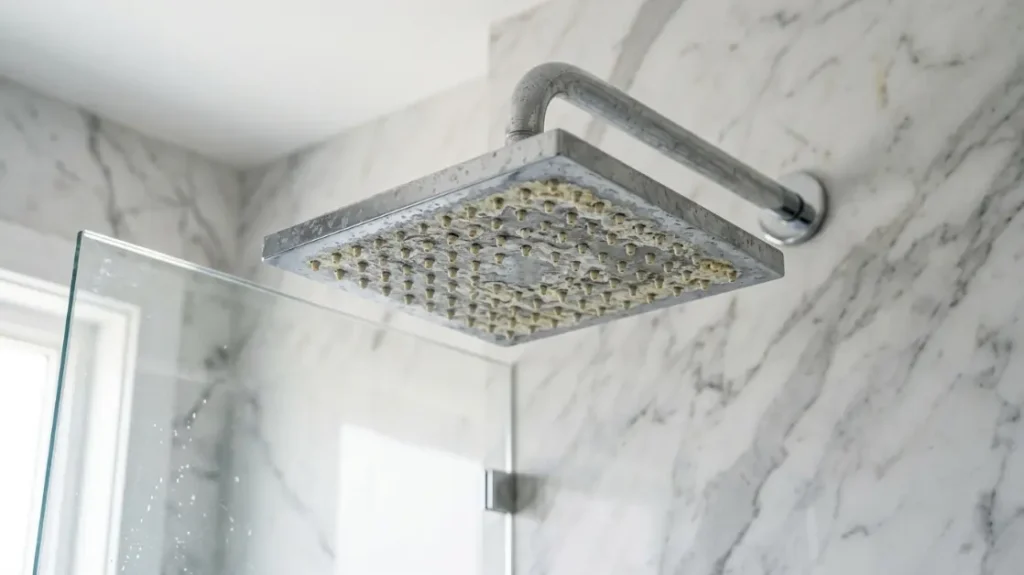
Cleaning a rainfall shower head takes less than an hour and requires no special tools. White vinegar and a toothbrush handle most jobs. Over time, mineral buildup clogs the nozzles, blocks water flow, and drops your water pressure to a trickle. Hard water speeds this process up fast. The good news is that you do not need to call a plumber or buy expensive products to fix it. This guide walks you through two proven cleaning methods, shows you how to protect different finishes, and helps you keep your shower head working like new. How to Clean a Rainfall Shower Head Without Removing It No tools required for this one. If your shower is losing pressure or spraying unevenly, this is the first method to try. It tackles mineral buildup without any dismantling. What You Will Need Step-by-Step Cleaning Process 1. Pour 500ml to 1 litre of white distilled vinegar straight into the zip-lock bag. 2. Lift the bag around the shower head so the entire face sits submerged in the vinegar. 3. Loop a thick rubber band around the neck at least twice or a zip tie to stop the bag from drooping under the weight of the vinegar. 4. When done soaking, remove the bag and scrub each of the nozzle holes with your toothbrush in tight circular motions. 5. Then switch the shower on and run hot water for two to three minutes to push any loosened deposits out. How Long Should You Soak It? Thirty minutes is plenty for a rainfall shower head with a light scale. Heavier deposits need longer — anywhere from one to two hours does the job. Just do not push past two hours on nickel or brass finishes. Vinegar is acidic, and extended contact can wear the surface down over time. For stubborn limescale that will not budge, check out our guide on how to clean limescale from a shower head. How to Clean a Removable Rainfall Shower Head This method works best for heavy clogs or when the bag soak did not fully restore water pressure. Taking the head off gives you direct access to every nozzle. Remove the Shower Head Safely Wrap a cloth around the connector nut before touching it with a wrench. This one step protects the finish from scratches. Turn the head counterclockwise until it comes free, and support the weight with your other hand — larger rainfall heads can be surprisingly heavy. Soak and Scrub the Nozzles 1. Place the shower head face-down in a bowl and pour in enough white distilled vinegar to fully cover the nozzle surface — roughly 500ml to 1 litre. 2. Soak 1-2 hours, depending on the amount of clogging of the nozzles. 3. Use a soft toothbrush to clean each silicone nozzle separately. The silicone nozzles are flexible, too, so you can break up deposits with your thumb. 4. Rinse the entire head thoroughly under warm running water. Retighten and Test Water Flow Tighten the head on by hand, and snug it with your wrench. Turn the shower on and check around the connector for any drips. Run the water for 30 seconds to flush out loosened deposits and confirm you have restored water pressure in your rainfall shower head. Own a Moen fixture? Our guide on how to clean a Moen shower head walks through brand-specific steps in detail. How to Clean Rainfall Shower Heads With Premium Finishes Premium finishes such as matte black, brushed gold, and rose gold are more sensitive than standard chrome. Using the wrong cleaner even once can strip the coating permanently and void your warranty. Matte Black Finish Matte black is one of the most popular finishes right now, but it scratches and dulls easily. Skip abrasive pads and bleach completely. Instead, mix a small drop of mild dish soap with warm water and wipe the surface down gently. Dry it straight away with a soft cloth — water left sitting on matte black leaves spots that are hard to shift. Never apply vinegar directly to this finish. Fixture manufacturer care guides widely flag this, as repeated acid contact dulls the coating over time. Gold, Rose Gold, and Brushed Brass Finishes These finishes are beautiful but thin. Always use a pH-neutral cleaner rather than anything acidic. Keep soaking time short, and never scrub. A soft microfiber cloth dampened with warm water is all you need for routine shower fixture maintenance on gold and rose gold surfaces. Brushed Nickel and Chrome Finishes Both finishes handle moisture better than most. White vinegar works fine here as long as you dilute it with equal parts water. Rinse the surface well after cleaning and buff it dry to bring back the shine. Quick Tip: Always check manufacturer guidelines. Every brand uses different coating technology on its fixtures. A cleaner that is safe for one matte black shower head may not suit another. Always check your care manual before trying any new cleaning product. Finish Safe Cleaner Avoid Matte Black Mild dish soap + warm water Vinegar, bleach, and abrasive pads Gold / Rose Gold / Brushed Brass pH-neutral cleaner, damp microfiber Acids, long soaks, and scrubbing Brushed Nickel Diluted white vinegar Undiluted acids, abrasive tools Chrome Diluted white vinegar Bleach, steel wool Common Mistakes and How to Avoid Them Most cleaning damage is avoidable. These five mistakes trip people up more than anything else. How to Keep Your Rainfall Shower Head Clean for Longer Preventing hard water buildup is far easier than scrubbing it off later. These simple habits make a real difference. 1. A quick once-over with a dry cloth stops mineral deposits from forming in the first place. 2. Run hot water for 30 seconds before turning the shower off. This flushes fresh deposits through before they settle. 3. Do a light vinegar soak once a month. Maintenance soaks help prevent limescale build-up. 4. Use a water softener if your home has hard water. Soft water dramatically reduces the mineral load hitting your fixtures