Health faucets are now a standard fixture in most Indian bathrooms — in homes, offices, and even budget hotels. The good news is that they work with both Indian-style floor-mounted pans and Western-style wall-mounted commodes, so you do not need to worry about compatibility.
Most Indian bathrooms already have a 15mm water inlet near the toilet, which is exactly what a health faucet needs. So no major plumbing work is required.
A standard health faucet fits any toilet type. You only need basic tools, and no professional plumber is needed for a normal installation. Most faucets come in a 1.2-metre hose length, which works for most setups. The whole job takes around 30 minutes.
This guide walks you through every step of the installation from gathering tools to testing the final connection.
Check Your Bathroom Setup Before Installation
Before you buy anything, spend two minutes looking at your bathroom. This saves you an extra trip to the hardware store.
Western-Style (Wall-Mounted Commode)
- The health faucet mounts on the wall beside the flush tank.
- You will connect it to the existing angle valve using a T-valve (also called a diverter valve).
- Most homes already have an angle valve here, check behind or beside the tank.
Indian-Style (Floor-Mounted Pan)
- The faucet holder goes on the wall beside the pan, roughly at waist height.
- You need a water outlet within 1 to 1.2 metres of the pan.
- If there is no outlet nearby, you will need to add an angle valve — a plumber can do this in under an hour.
Quick Compatibility Checklist
- Is there a water outlet or angle valve within reach of your toilet?
- Does your home have enough water pressure? (A gentle, steady flow from the tap is enough)
- Is there a clear patch of wall to fix the faucet holder?
Standard Indian plumbing uses 1/2-inch BSP (15mm) threads, and almost every health faucet sold in India is built to match this size, but confirm before buying.
Health Faucet Sizes and Prices in India
All standard health faucets in India use a 1/2-inch BSP (15mm) connection, so they fit directly onto Indian plumbing without any adapters. Picking the right hose length matters more than most people think.
Common Hose Lengths
- 1 Metre: Works in compact bathrooms with limited wall space.
- 1.2 Metre: The most common choice for Western-style toilet setups.
- 1.25 Metre: Ships as the default length in many branded kits.
- 1.5 Metre: Suits Indian-style floor pan toilets or larger bathrooms.
Price Guide by Material
| Material | Price Range (INR) | Best For |
| ABS Plastic | ₹150 – ₹400 | Tight budgets, rental homes |
| PTMT | ₹400 – ₹900 | Mid-range, rust-free daily use |
| Stainless Steel | ₹700 – ₹1,500 | Durability, hard water areas |
| Brass | ₹1,200 – ₹3,000 | Long-term use, premium finish |
Buying Tip: PTMT works well for most homes; it does not rust, handles daily use easily, and costs far less than brass or steel.
Tools and Materials You Need
Gather everything before you start. This keeps the job clean and fast.
Tools
- Adjustable wrench — for tightening connections
- PTFE tape — to seal all threaded joints
- Screwdriver — flathead or Phillips
- Drill machine — only if fixing the holder into a tiled wall
Materials / Kit Components
- Spray gun (nozzle) — the handheld faucet head
- Flexible hose — connects gun to water supply
- Holder bracket — wall mount for the spray gun
- Rubber washers — prevent leaks at joints
- T-valve or diverter valve — splits water to both the flush and the faucet
Most Indian health faucet kits already include all the materials listed above, so check your kit box before buying anything separately.
How to Install a Health Faucet Step-by-Step
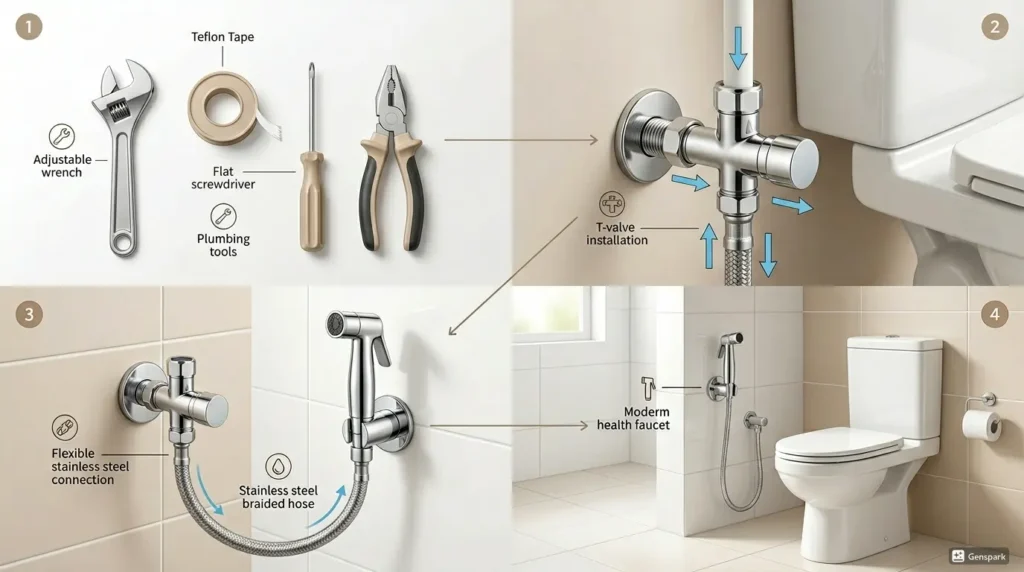
These steps work for most Indian bathrooms. Take it one step at a time, and you will finish in about 30 minutes.
Step 1: Turn Off the Water Supply
Look for the angle valve sitting behind or just beside your toilet — it is a small tap-like knob. Turn it clockwise until it stops. No angle valve? Go shut the main bathroom water line instead.
After closing it, flush the toilet once. That push clears out the water still sitting in the pipe, so it does not spray on you when you open the joint.
Step 2: Remove the Existing Water Connection
The inlet pipe runs from the angle valve up into the bottom of your flush tank. Loosen the nut where it meets the tank, but hold the tank fitting steady with your other hand.
Do not let it spin; it can crack the tank inlet. Pull the pipe away and set it aside. Tuck a dry cloth under the joint right away because some water will still drip out.
Tip: Before you remove anything, take a quick photo with your phone. When you are putting it all back together, that photo saves a lot of guessing.
Step 3: Apply PTFE Tape on Threads
Pick up the PTFE tape and wrap it around the male thread going clockwise — the same direction you will screw the fitting in. Pull the tape tight as you wrap. Go around three to four times.
One loose round of tape does nothing. Do this on every single threaded joint in this job, not just one or two. That tape is what keeps slow drips from showing up three days later.
Step 4: Install the T-Valve
The T-valve goes where your old inlet pipe used to connect at the outlet of the angle valve.
It has three openings. One sits on the angle valve, one feeds the flush tank, and the last one takes the health faucet hose. Start screwing it on by hand until it feels snug. Then use the wrench for one firm quarter-turn.
Tip: Stop at one-quarter turn with the wrench. Tightening beyond that can split a plastic T-valve or damage the thread on the angle valve.
Step 5: Connect the Hose
Before you thread the hose connector onto anything, peek inside the connector and check that the small rubber washer is sitting flat inside it. If that washer is missing or tilted, water will drip no matter how tight you go.
Screw one end onto the T-valve and the other onto the spray gun. Hand-tighten both ends first, then add a quarter-turn with the wrench. That is all it needs.
Step 6: Attach the Spray Gun
Hold the spray gun with one hand, then slowly bring the hose connector up to it. Before you begin turning, make sure the threads line up neatly. If the connector feels stiff right from the first turn, stop — it is cross-threading. Back it off and start again.
Once it turns smoothly, hand-tighten it fully. Add one quarter-turn with the wrench at the end, then give the gun a light tug to check that it holds firm.
Step 7: Install the Holder Bracket
The bracket goes on the wall at around 90 to 100 cm from the floor. That height feels natural for most adults standing at the toilet. Put it on the wall closest to your stronger hand, about 15 to 20 cm away from the toilet edge.
Use a pencil to mark your drill points before you start. When drilling into tiles, go slow with a tile bit and steady pressure — rushing cracks the tile.
Tip: Not comfortable drilling into tiles? A strong adhesive hook rated for 2 kg or more works as a solid temporary fix until you are ready.
Step 8: Turn On the Water Supply and Test
Open the angle valve slowly; do not crank it all the way open in one shot. Let the water ease into the system. Now go joint by joint: check the T-valve first, then both ends of the hose, then where the gun connects.
Press the trigger on the spray gun and let it run for about 30 seconds. Watch every joint while it runs. See a drip? Close the valve, dry that joint completely, add another layer of PTFE tape, and reconnect. A dry joint takes tape much better than a wet one.
Common Mistakes to Avoid During Health Faucet Installation
Small slip-ups cause most of the leaks and loose fittings people deal with after installation.
- Skipping PTFE tape: Dry threads leak slowly, and the drip often shows up days later. Tape every threaded joint without exception.
- Missing rubber washers: A washer-free connector drips even when cranked tight. Always check inside the connector before screwing it on.
- Over-tightening fittings: Too much force cracks plastic connectors and strips threads. Hand-tight plus a quarter-turn is sufficient.
- Using the wrong thread size: Mismatched thread damages both fittings. Confirm 1/2 inch BSP prior to the purchase of any part.
- Choosing a hose that’s too short: A short hose pulls at the joints and causes leaks. Measure the distance from the valve to the toilet, and choose a length.
- Poor holder placement: A bracket fixed too far from the toilet makes the faucet awkward to reach. Keep it within 20 cm of the toilet edge.
- Not checking water pressure first: Very low pressure makes the spray gun nearly useless. Run your tap and check the flow before starting the job.
Troubleshooting Common Problems After Installation
Most problems after a health faucet installation have a simple fix you can do yourself.
| Problem | Likely Cause | Quick Fix |
| Leakage at a joint | Missing or loose PTFE tape | Dry the joint, rewrap with PTFE tape, and reconnect firmly |
| Weak water pressure | Partially closed angle valve | Open the angle valve fully and check for kinks in the hose |
| Water drips from the gun when not in use | Worn trigger valve inside the gun | Replace the spray gun head |
| Hose keeps twisting or kinking | Hose too short or bracket placed at a sharp angle | Switch to a longer hose or reposition the holder bracket |
If the problem continues after trying these fixes, the spray gun head itself is likely faulty. Most Indian brands sell replacement heads for ₹150 to ₹300, and they fit standard hoses without any extra fittings.
Final Thoughts
Installing a health faucet is one of the simpler plumbing jobs you can do at home. Most Indian bathrooms already have the right plumbing in place. Pick the correct hose length, use PTFE tape on every thread, and check that washers sit inside every connector; those two things alone prevent most leaks. The whole job wraps up in under 30 minutes.
Once done, test every joint before you start using it daily. A quick check now saves a bigger fix later. If you are still picking a faucet, browse our health faucet collection to find one that fits your bathroom and budget.
Frequently Asked Questions
Can I Install a Health Faucet Without a T-Valve?
Only if your bathroom already has a separate water outlet close to the toilet. In most Indian homes, the only outlet near the toilet feeds the flush tank, so a T-valve is needed to split that supply. Without one, you would have to choose between the flush and the faucet.
Does a Health Faucet Work With a Low-Pressure Water Supply?
It works, but the spray will feel weak. Most health faucets need at least 0.5 kg/cm² of water pressure to give a decent flow. If your building has very low pressure, consider a faucet with a wider nozzle head; it gives better coverage even at low pressure.
Can I Use a Health Faucet With a Geyser or Hot Water Line?
Most standard health faucets handle cold water only. Connecting them to a hot water line warps the plastic parts over time. If you want warm water, buy a health faucet specifically rated for hot water use — some brass and steel models support this.
How Long Does a Health Faucet Typically Last?
A decent PTMT or stainless steel health faucet lasts four to seven years with regular use. Cheaper ABS plastic models may need replacement within two to three years, especially in homes with hard water.
Is It Possible to Install a Health Faucet Without Drilling Into the Wall?
Yes. A strong adhesive hook rated for at least 2 kg holds the bracket on most tiled walls. This works well in rented homes where drilling is not allowed. The hold is firm enough for daily use, though it may weaken over time in very humid bathrooms.
Related Products
Explore products related to this article
-
 25%
25%Box Drain with Flip Bowl – 100×450 mm Stainless Steel Floor Drain
Original price was: ₹2,500.00.₹1,875.00Current price is: ₹1,875.00. Add to cart -
58%
Bonn Hand Shower ABS AB2136 | Begin Faucets
Original price was: ₹2,750.00.₹1,150.00Current price is: ₹1,150.00. Add to cart -
25%
Brass Extension Nipple 1 Inch (25mm) AA0001 – 5pcs | Begin Faucets
Original price was: ₹519.00.₹390.00Current price is: ₹390.00. Add to cart -
25%
Overhead Shower Leaf Shape Chrome Finish AB3101 | BEGIN Faucets
Original price was: ₹1,400.00.₹1,050.00Current price is: ₹1,050.00. Add to cart